
Implement Undo and Redo in Unreal Engine
Undo and Redo are probably the two most essential actions whenever you are making Unreal Engine editor tool. This post will explain how to implement these two actions in C++ and blueprints.

What you will learn
This post will explain what transactions are, how Unreal Engine implements them, and how to use them in your editor tools with success making users of your tools happy people.
What is a transaction
Conceptually, a transaction is a set of instructions that change state of a certain entity. These sets are then recorded and stored in some higher level system that allows to undo all instructions that have been part of a specific set.
Unreal Engine has a built-in transaction system is no exception making it relatively easy to implement undo and redo actions. The main concept of a transaction in Unreal is:
Notify the system that a transaction is beginning
Mark all objects that are subjects of being modified
Modify the objects
Notify the system about the transaction being over
Executing all the above steps form a single transaction. This transaction can be undone and redone. What it means is that every object marked in step 2. and modified in step 3. is now part of this transaction and can be manipulated as desired. Note that there is no limit of how many objects are marked and modified in these two steps.
Blueprints implementation
This is a set of functions exposed to blueprints by default.
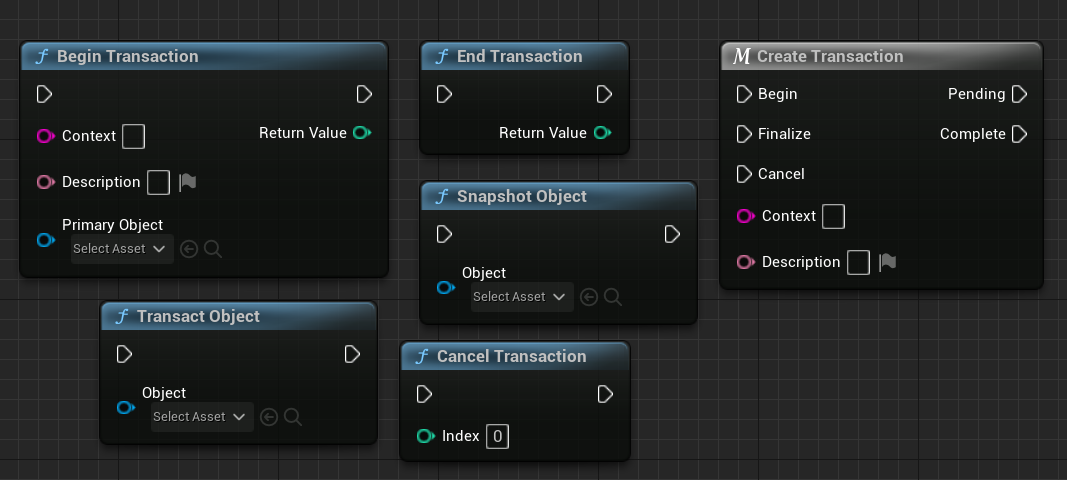
This is more than enough for us to be able to fully leverage the transactions system. Let’s cover them one by one.
Begin Transaction notifies system that a transaction is beginning and every object being marked after this function is going to be a part of this single transaction. It’s parameters are:
Context— arbitrary string, however it is recommended to use meaningful name, i. e. the tool’s nameDescription— this is a text that will appear in the bottom right corner, inside a notification bubblePrimary Object— quating documentation, “… (can be null, and mostly is).
The returned integer value is a number of active actions when this function was called. In majority of cases this should be equal to 0. If it returns -1, it means that beginning transaction failed. If it returns a positive value, it means that there was alreading another transaction in progress.
End Transaction notifies system that a transaction has ended and puts it on a stack allowing user to request an undo action and reverting every change that happened between these Begin Transaction and this function. It returns number of active actions was called. Again, is most cases you want the returned value to be equal to 1 as it means that exactly 1 action has been closed. It returns -1 when failed.
Transact Object notifies the system that given object is going to be modified and should be put as part of the ongoing transaction.
Snapshot Object is emitting a snapshot event if a given object is currently transacting. Description of this function is identical to the description of Transact Object however they do not work the in the same way. Calling this function will not cause an object to be a part of a transaction.
Cancel Transaction cancels transaction which index has been passed as parameter (as returned from the `Begin Transaction` function). After this function has been called, objects are no longer recorded into a transaction and any changes that have been made, cannot be undone.
Create Transaction macro. This one doesn’t really need extra explanation, this is just merging multiple nodes mentioned above into a single macro node. Given how difficult macro nodes are to debug I advise against using it.
Now that we have all necessary functions covered it is important to note that there are certain actions in Unreal Engine that do not need to be explicitly marked as part of a transaction. One of them is for example spawning an actor.
Let’s take a look at the following graph.

You can notice that there is no explicit call to Transact Object. After this code is executed I can simply press CTRL+Z to undo the action, and the spawned actor will be destroyed.
Now let’s look at another example.

Here you can see me calling a `Cancel Transaction` at the end. After this event is executed, when I press CTRL+Z nothing is happening, the actor remains untouched on a map.
Finally, the last example, showing how to properly “record” an object when modifying it’s property.

After validating that a reference to the previously created cube is valid, I am beginning a transaction, marking the object, modifying it, and then ending the transaction. As you can imagine, requesting undo action is restoring previous state of the properties, moving the actor back to it’s location.
Code implementation
All functions mentioned in the paragraph covering blueprint implementation are part of a UKismetSystemLibrary. This means that there is no difference in their usage between blueprints and code. Simply access static functions by calling `UKismetSystemLibrary::` namespace and enjoy a luxury of the transaction system!
Summary
By now, you should know everything you need to use Unreal Engine’s transaction system in your tools. I wish you happy un- and redoing!